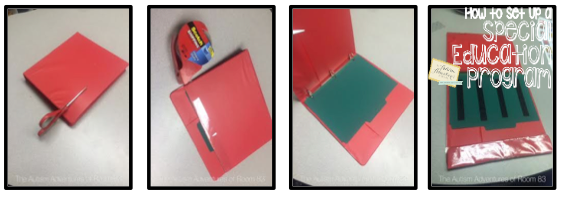
“How To Set Up A Special Education Program”- Communication Day 2
How To
Set Up A PECS Book
Set Up A PECS Book
PEC’s
is a great system for communication.
Once your student has progressed through the beginning stages of PEC’s
it is time to introduce a sentence strip to build full sentence
communication. Simply follow the steps
below to make your own PECs book!
is a great system for communication.
Once your student has progressed through the beginning stages of PEC’s
it is time to introduce a sentence strip to build full sentence
communication. Simply follow the steps
below to make your own PECs book!
“Real
Pictures” PECS
Pictures” PECS
I
have some students who benefit from using real photographs for PECs
communication. Below is a sample of a
communication book I set up using large (3×5) photographs for this
student. She had a physical disability
and was unable to manage smaller icons thus I used larger pictures. To start, I worked with her favorite
toys/activiites. In order to teach
communication- I find it most successful teaching communicating “wants” first. Once students understand the exchange of
icons for preferred items, it will be easier to teach communication for needs
and academic purposes. Here are a few
pictures:


“Real
Pictures/Clip Art” PECS
Pictures/Clip Art” PECS
I
have some students who started with “real pictures” in their own PECS communication book. As they begin to master the concept of PECs,
I try to introduce “clip art” images into their book. I like to start with colors, shapes, numbers
and common classroom items (book/ pencil/ computer etc.).


have some students who started with “real pictures” in their own PECS communication book. As they begin to master the concept of PECs,
I try to introduce “clip art” images into their book. I like to start with colors, shapes, numbers
and common classroom items (book/ pencil/ computer etc.).
“Clip Art”
PECS
PECS
Sometimes
you come across a student with the most advanced cognitive development, yet no
“voice”. Unfortunately sometimes these
kiddo’s have slipped through the cracks for a few years. For students that have either spent time
expanding their PECs book or have demonstrated the understanding of PECs, it’s
time to set up a large and in depth communication book for them. If the student has the ability to talk- we
don’t want to limit their word base.
Here is a sample of a full communication book that can be used for these
students. I designed it myself to meet
my non-verbal or limited speaking students needs.

This
book has over 500 Boardmaker PECS organized into
book has over 500 Boardmaker PECS organized into
27
pages total! Each page has a visual tab so that it is easy to flip through the
book.

pages total! Each page has a visual tab so that it is easy to flip through the
book.
Using Boardmaker images, this book
is a great introductory PECS tools that can be used in any classroom or
home. Here are some pages to the PECS book:


Like
my PECs communication book I mentioned on the last page, I have also created a
communication aide book using the same format/layout. The only difference is that this book does
not need to be assembled with velcro.
Each page can be printed and laminated.
I used this book with one student who was VELCRO crazy. Giving him a book like this was like a gift
on Christmas morning- the icons were too distracting for him. I made this book for him- and II taught him
to simply point to each icon to communicate.
Once I removed the velcro/exchange process he was able to communicate
fluently to his peers. While this is not
considered “PECS’ since there is no exchange involved, it is a personalized
form of communication that benefited this one student and their individual
needs. It can also be used with limited
verbal speaking students who need that extra prompt to get their thoughts
out! Here are a few pictures!
High Tech
Communication Devices
Communication Devices
The
newest craze in Special Education is the use of High tech Communication devices. This can be any iPad, tablet or computer
technologies for special needs that provides voice out put communication.. I have worked with several different types
and get asked all the time which one is my favorite. I can’t answer that because every student
benefits from different equipment.


4
Compartment Communication Device
Compartment Communication Device
This
is a 4 Compartment Communicating device. I got this device ordered for
one of my lowest students who is non-verbal. He can tantrum/cry for hours
in a day when we are unable to figure out what he wants or what is bothering
him. While we have a simple 4 icon PECs
book set up for him, he is still hand over hand dependent at this time.
This
low tech communication device is a great tool for every special education program. It is a great way to teach students to
communicate their BASIC wants through preferred objects for students who are
unable to recognize pictures. You can
simply pick four items to target at a time (ex: food items, crayons, art
supplies). Program
the device so that each slot has the correct voice out put. Teach the student to request the desired item
by clicking on the corresponding button.
It’s important to follow through- so if they request something- hand it
to them! It is very important to respect their request in the early stages of
communication!
Tomorrow is Day 3 of Communication week… and let me tell you- it’s a good one!